This website is made with Jekyll
What is Jekyll?
Jekyll https://jekyllrb.com/ is a static website generator made by Github. Jekyll takes plain text and markdown and converts it into beautiful websites. It does this by rendering html from your markdown and combining that with what we call a theme.
Themes give your pages a layout such as a blog or a resume site. Themes typically come with configuration files that have premade variables ready to customize areas of your website. Beyond built in customization there are certain directories you can ‘override’ by writing identical directories to replace css to suit your needs. Themes are based on Ruby gems and can be easily swapped out once you set Jekyll up.
This website, for example, uses Jekyll to generate static content using the theme called Chirpy found here https://github.com/cotes2020/jekyll-theme-chirpy.
What is Github Pages?
Github Pages https://pages.github.com/ was created with the idea of hosting a static website directly from your Github repository. Essentially as long as you have an index.html file at the base of your website directory you can push to github and host a website. Jekyll works great for this since you can write something like a blog post in plain text, mark it up with how you’d like it to look, generate the real website from that markdown, and upload it to Github.
Does this interest you? Let’s build this really cool pipeline.
Some concepts
Jekyll is written in a language called Ruby. One of the major things that sets Ruby apart as a language is the attempt to make code reusable. One of the ways Ruby does this is in the form of Gems. A Gem is code written to provide a specific function and no more, allowing it to be reused much like a function. It can be re-used in your own projects or shared with others. Jekyll is written as multiple gems pieced together to make a cohesive application.
Every Jekyll site contains something called a Gemfile. A gemfile is a list of gems included to create the website. These gems are pulled from the repository at https://rubygems.org.
Bundler is another gem but this one is special. Bundler’s specific gem duty is to take a gemfile and download and install all its gems. Jekyll uses bundler to make sure its plugins and dependencies are installed. Chirpy, the theme used by this website, is coded as a gem and requires its own dependencies. If you guessed Chirpy has a gemfile, you’d be right.
A quick word on SCSS and CSS. Both are used in styling pages but SCSS tends to be based more around using variables and something called ‘mixins’. Mixins are a similar concept to gems in that they are sections of reusable code. You write SCSS with variables so they are easily editable later, and the final product is written out as CSS. This project uses a lot of SCSS since it’s written in Ruby. When you see things like the @import below in the scss file that simply means it is including another scss file. This is common. At the end of the day it’s all just an attempt to break down code into sections for reusability.
Installing prerequisites
Jekyll requires you to install Ruby, RubyGems, GCC, and Make.
Jekyll does a great job with this and actually includes installation directions for each operating system: https://jekyllrb.com/docs/installation/
Once this finishes you’ll need to install Jekyll and bundler.
1
gem install jekyll bundler
Installing Jekyll with Chirpy
At this point we could run Jekyll projects but this guide is about showcasing a theme. Chirpy provides two ways to download and install their theme. These are covered at the Chirpy website here: Chirpy Theme setup.
To summarize though:
Option 1: Installing via template
Install as a completely setup template. This is great if you think the default look and feel of Chirpy is good as is. This is really just as simple as signing into Github, going here, and clicking the button Use this template > Create a new repository, and name the new repository USERNAME.github.io, where USERNAME represents your GitHub username. I won’t cover this method in any more detail since I do not use it. Fair warning that using a template and then trying to modify fonts/colors/css can be more challenging and custom websites are better for option 2.
Option 2: Fork the chirpy repository
Fork the Chirpy theme website. I like this method better because it is a complete download and setup of the website including all files needed to fully customize it.
Firstly, clone the repository here to your Github and then pull it down locally.
Next install node.js here: https://nodejs.org/en.
The fork comes with a script to setup the initial website in Github. This will check out the latest Chirpy theme repository, remove example files, build out any other necessary javascript files and commit a change to trigger a Github actions (this builds your website on Github). Make sure you’re in the forked directory.
1
bash tools/init
Before running the site locally for the first time make sure you’re in the base directory of your project and install all gems.
1
bundle
Now you can start server and visit website GUI:
1
2
bundle exec jekyll s
# find website at http://127.0.0.1:4000
Before the deployment begins, check out the file _config.yml and make sure the url is configured correctly. Furthermore, if you prefer the project site and don’t use a custom domain, or you want to visit your website with a base URL on a web server other than GitHub Pages, remember to change the baseurl to your project name that starts with a slash, e.g, /project-name.
There are some things you need to know deploying via Github pages:
- If you’re on the GitHub Free plan, keep your site repository public.
- If you have committed Gemfile.lock to the repository, and your local machine is not running Linux, go the root of your site and update the platform list of the lock-file using bundle command:
1
bundle lock --add-platform x86_64-linux
Great! Now open a browser and go to your repository on GitHub. Select the tab Settings, then click Pages in the left navigation bar. Then, in the Source section (under Build and deployment), select GitHub Actions from the dropdown menu.
Push any commits to GitHub to trigger the Actions workflow. In the Actions tab of your repository, you should see the workflow Build and Deploy running. Once the build is complete and successful, the site will be deployed automatically. If you have any errors drill down and find out why inside Github actions section of Github. You will likely have errors so get used to reading them inside github actions.
At this point, you can go to the URL indicated by GitHub to access your site.
Usage
Here you will find some general guidelines on using Jekyll. For the most part Jekyll and Chirpy have great documentation so I will just be linking to them below. However, for some specific things I had to search a little harder for you can find those below as well.
Jekyll docs: Jekyll page building
Chirpy docs: Chirpy formatting
Editing colors/layout
You may want to change the colors or look of the website. The best way to do this is to use the built in SCSS file included within the forked repository.
Inside /assets/css/jekyll-chirpy-theme.scss you will find this file. Here is mine for this website currently.
1
2
3
4
5
6
7
8
9
10
11
12
13
14
15
16
17
18
19
20
21
22
23
24
25
26
27
28
29
30
31
32
33
34
35
36
37
38
39
40
41
42
43
44
45
46
47
48
49
50
51
52
53
54
55
56
57
58
59
60
61
62
63
64
65
66
67
68
69
70
---
---

@import 'main';

/* Dark mode variables available for editing */
html[data-mode=dark] {
    --heading-color: #ae81ff;
    --label-color: #62ea00;
    --site-title-color: #62ea00;
    --site-subtitle-color: #868686;
    --sidebar-muted-color: #ae81ff;
    --sidebar-active-color: #62ea00;
    --sidebar-btn-color: #ae81ff;
    --avatar-border-color: rgb(206, 206, 206, 0.9);
    --search-border-color: #ae81ff;
    --search-icon-color: #62ea00;
    --input-focus-border-color: #62ea00;
    --toc-highlight: #62ea00;
    --prompt-text-color: rgb(216, 212, 212, 0.75);
    --prompt-tip-bg: rgb(22, 60, 36, 0.64);
    --prompt-tip-icon-color: rgb(15, 164, 15, 0.81);
    --prompt-info-bg: rgb(7, 59, 104, 0.8);
    --prompt-info-icon-color: #0075d1;
    --prompt-warning-bg: rgb(90, 69, 3, 0.88);
    --prompt-warning-icon-color: rgb(255, 165, 0, 0.8);
    --prompt-danger-bg: rgb(86, 28, 8, 0.8);
    --prompt-danger-icon-color: #cd0202;
    --tag-border: #ae81ff;
    color-scheme: dark;
}

/* Change text for tags page only to green */
#search-results a, #search-hints .post-tag, a {
    color: #62ea00;
}

/* Change panel hover only text color to green and border hover to purple */
.btn:hover {
    color: #62ea00;
    background-color: #302e31;
    border-color: #ae81ff;
}

/* Change side panel only tag border to purple and text to green */
.post-tag {
    border: 1px solid #ae81ff;
    color: #62ea00;
}

/* Change tag hover color on side panel only to purple */
.btn.btn-outline-primary:not(.disabled):hover {
    border-color: #ae81ff !important;
}

/* Change link colors to green hover and purple underline across all pages */
#page-category a:hover, #page-tag a:hover, .post-tags .post-tag:hover, .post-tail-wrapper .license-wrapper>a:hover, #search-results a:hover, #topbar #breadcrumb a:hover, .content a:not(.img-link):hover, .post-meta a:not([class]):hover, #access-lastmod a:hover, footer a:hover {
    color: #62ea00 !important;
    border-bottom: 1px solid #ae81ff;
}

/* Change table of contents non-focus non-highlight items to purple */
#toc-wrapper ul .toc-link {
    color: #ae81ff;
}

/* Change end of post navigation to purple headings */
.post-navigation .btn:not(:hover) {
    color: #ae81ff;
}
How do I know which CSS to include within this file as override styles? The key to obtaining information like this is using the browser developer tool. If you’re not familiar you can go to your website in a browser, go typically under more tools > developer tools. Now you can click the top left arrow which looks like a mouse pointer and use that to hover over any site element. When clicking on that element you can often find the CSS you’re looking to modify.
You may want to override HTML as well. You can modify most of these by modfying the _includes files.
How do I link to another post?
You can link another post internally by referencing it like below:
1
[link name here]({% post_url 2023-09-02-postname %})
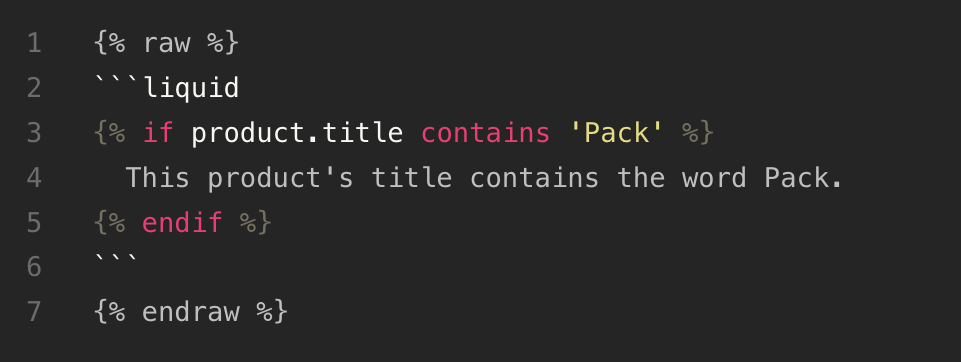
Using codeblock around template language
Sometimes you will encounter wanting to codeblock something that liquid (the template renderer of Jekyll) wants to render. You can avoid this and still make a code block by using raw and endraw around the codeblock.
Adding a favicon
The favicons of Chirpy are placed in the directory assets/img/favicons/. You may want to replace them with your own. The following sections will guide you to create and replace the default favicons.
-
Generate the favicon Prepare a square image (PNG, JPG, or SVG) with a size of 512x512 or more, and then go to the online tool Real Favicon Generator and click the button
Select your Favicon imageto upload your image file. -
In the next step, the webpage will show all usage scenarios. You can keep the default options, scroll to the bottom of the page, and click the button Generate your Favicons and HTML code to generate the favicon.
-
Download the generated package, unzip and delete the following two from the extracted files:
1
2
browserconfig.xml
site.webmanifest
And then copy the remaining image files (.PNG and .ICO) to cover the original files in the directory assets/img/favicons/ of your Jekyll site. If your Jekyll site doesn’t have this directory yet, just create one.
Changing the logo
To change the main logo of the page you need to replace the logo.png file inside the images folder


